Snap7 Partner
The Smart7Partner allows you to create a S7 peer to peer communication.
The Siemens model
Unlike the client-server model,
where the client makes a request and the server replies to it, the peer to peer
model sees two components with same rights, each of them can send data
asynchronously.
The only difference between them is the one who is requesting the connection.
The partner that requests the
connection is named active, the one that accept the connection is named passive.
Once the connection is established they can send unsolicited data.
The S7 protocol, as said, is command oriented, and the commands usually are executed by a server.
The partners communicate via the S7 Protocol, but using the untyped telegram "segmented data send".
This is not strictly a command,
it’s a data transfer that uses the S7 Protocol acknowledge mechanism.
In fact, it is not recognized by the client-server pair.
The communication is not fully asynchronous, i.e. there is no interrupt mechanism that says to the receiver that a packet is incoming : a partner to receive a packet , must be listening via a Block Recv function.
As said in The Siemens Theatre chapter, two PLC to communicate with this mechanism must have a S7 connection created with NetPro.
If the two PLC systems reside in
the same project, Simatic Manager can keep track of the connections, otherwise
both will have an unspecified partner as counterpart.
But, from the data transfer point of view there is no difference.
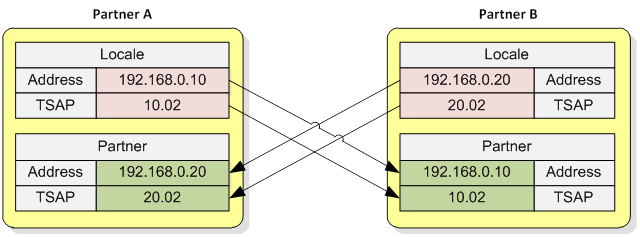
The partner addressing mechanism is not exactly easy to understand, however, let’s try to simplify our life.
Two friends want to talk to
each other, both they have a transceiver with antenna very directional.
To communicate, each needs to know their own geographical coordinates and those
of the other : latitude, longitude and elevation, to properly orient the
antenna.
Two PLC partners want to talk
each other.
To communicate, each needs to know their own S7 Network coordinates and those
of the other : IP Address and TSAP.
The TSAP concept belongs to the ISO/OSI Layer 4 but it’s not necessary to know it deeply, (moreover the Siemens use, does not follow strictly the specification) let’s say only that it is a number composed by HI Part and LO Part.
The main important thing is that all coordinates must be unique and crossed, just like a RS232 cable.
Note:
The HI part of the TSAP is not related with the lowest byte of the address in the example, it's just a coincidence.
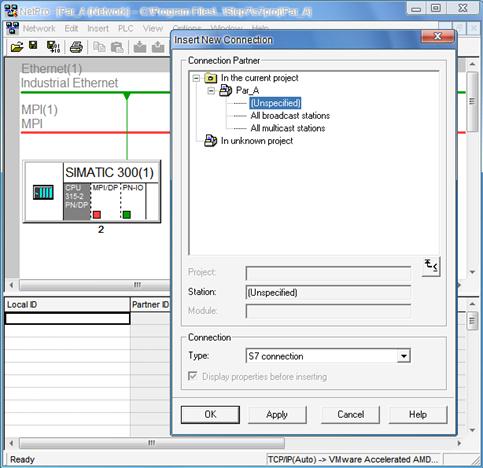
Now, Understood the mechanism, let’s translate it into S7 NetPro.
For both projects, open NetPro,
select the CPU and create a new connection
(menu Insert->New Connection) as follow.
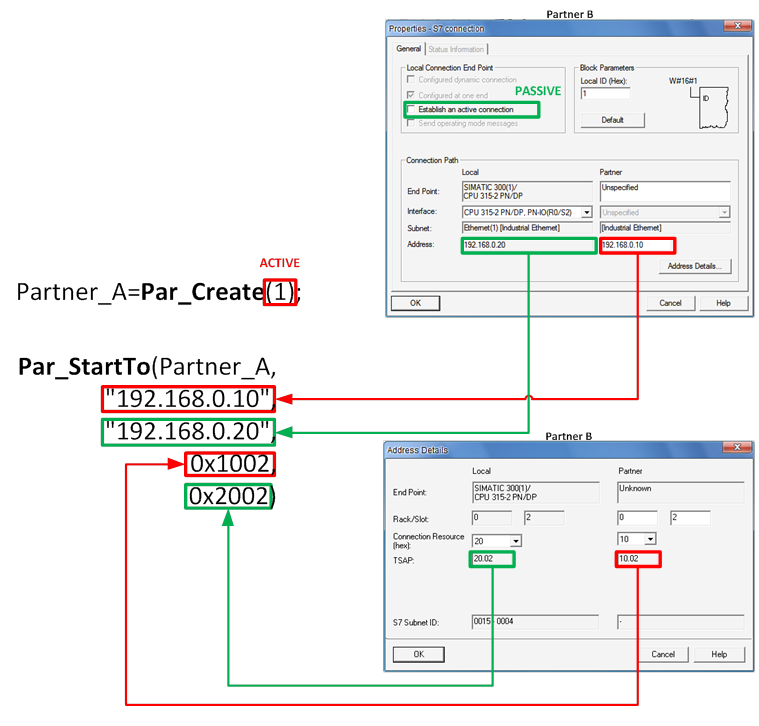
Then edit them; here we supposed that Partner A is the active one.
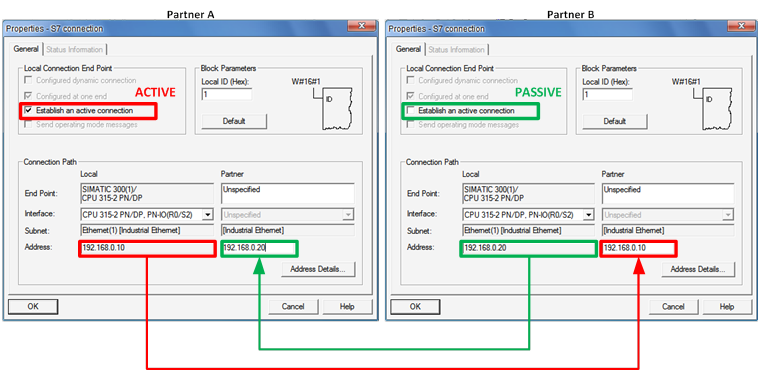
Press the "Address Details" button to open the TSAP dialog.
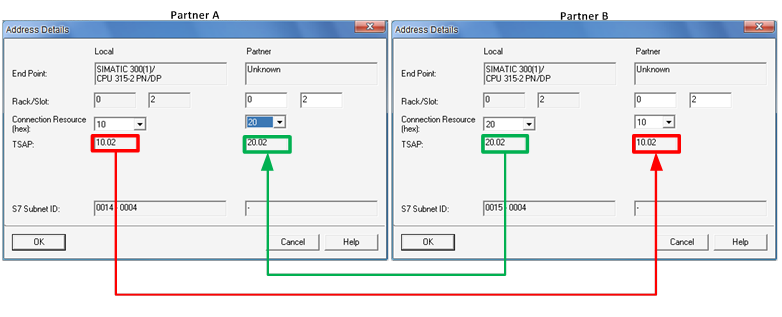
You cannot edit the TSAP value, it’s obtained starting from Rack, Slot and Connection Resource as follow:
TSAP-HI = Connection Resource
TSAP-LO = (Rack * 0x20) + Slot.
In the description of the function Cli_ConnectTo() you can find a detailed description of what Rack and Slot are.
Local ID (in the picture is W#16#1) is the Connection ID that must be used into the communication FB, leave unchanged what NetPro proposes.
Pick Connection Resource from the List, any not already-used value in both partners is good enough.
With this configuration, the two partners can communicate via FB12/FB13 (S7300) or SFB12/SFB13 (S7400), BSend/BRecv.
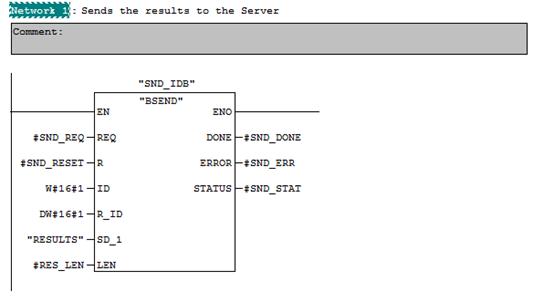
The parameter R_ID allows a further level of routing, the pair BSEND/BRECV must have the same value for it.
There is an important remark about it (to avoid a big headache).
If you use FB12 (S7300) you can change it at runtime, it is sampled on the rising edge of the REQ parameter.
The S7400/WinAC SFB12, instead, samples it on the rising edge of the stop->run sequence, you can change it across two transmissions, but this has no effect : the telegram will always be sent with the original R_ID and there is no way to debug it, since it’s an internal parameter.
The Snap7 model
The Snap7 model for the partner, faithfully follows the Siemens one, with some benefits:
1. No connection configuration is needed.
2. Two data send model :
a. Asynchronous with three completion models.
b. Synchronous - the caller is blocked until data are sent.
3. Two data receive models
a. Asynchronous - a callback is invoked when there is an incoming packet
b. Synchronous - calling BRecv just like using FB13.
There is a detailed description of the asynchronous data flow model in the Snap7Client, please refer to it for the theoretical part.
For the data exchange point of view the partners are equal as we will see, some remarks need to be done about the connection process.
When we create a partner we need
to specify its type : Active or Passive, their behavior, as
explained in the Siemens model, is different.
There is no way to change the partner type, once created.
Active Partner
It is quite simple to understand, it behaves like a client : requests a connection to the passive partner and waits the connection ack.
It’s also easy to understand that we can create how many partners we want and connect them to their passive counterpart.
Passive Partner
The passive partner behaves like a server : it waits for a connection request, listening onto the IsoTCP port.
Said that, we could think that we can create only one partner per adapter since we cannot bind two socket to the same 2-tuple (Address, Port).
Luckily there is a programming trick, the Connection Server that works as follow:
We create as many passive partners we want.
Each of them, when started, says
to the connection server :
“Boy, I’m waiting for a connection from a partner whose address is
192.168.10.30, call me if it passes here..”
Thus the connection server adds it into its passive partners list.
When an Active Partner requests
for a connection, the connection server reads its address and scans the list
for someone that is waiting for it.
If there is such client, it accepts the connection and gives the connected
socket to that passive client : the TCP connection now is established and they
can communicate.
If no such partner is found in the list, the connection is refused.
The connection server behaves like a Snap7Server, the difference is that the Snap7Server accepts any connection and creates its workers.
More than one connection servers can be created if passive partners have different local addresses.
Active and passive partners can coexist in the same application, as follow :
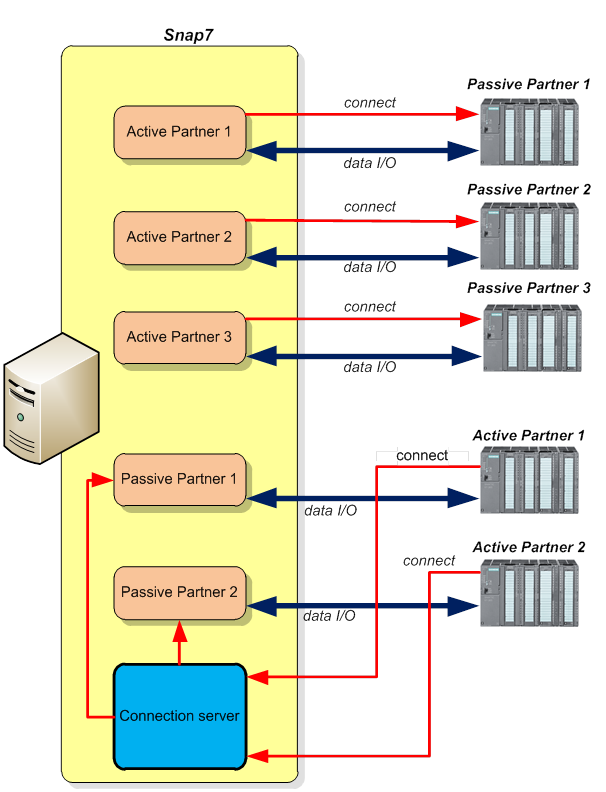
In order to optimize the host “bindable” addresses, the connection server is created on the “start” of the first passive partner and is destroyed on the “stop” of the last passive partner.
The use of active partners does not involve the server creation.
Partner use
Let’s see now the functions that Snap7 provides for working
with partners.
You can find their exact syntax in the Partner API chapter, now we focus on
their behavior.
Creation
A Partner must be created via the function Par_Create(int Active), where Active can be 1 or 0.
In the wrapper objects this parameter is boolean, and is internally converted
to integer, this because is always preferable to avoid booleans parameters in
multi-architecture/multi-compilers/multi OS programs.
Their differences stop here, from now every function is used for both partners.
Connection
Let’s see how to proceed with an example.
We have two partners, the first one is a Snap7Partner, and the other is a PLC partner. As seen, we need to create a network connection with NetPro for the real PLC.
We create this connection as follow :
· Leave unchanged Local Address and Local TSAP that NetPro offers us.
· As “Partner Address” we insert the PC IP Address.
· As “Partner TSAP” we insert whatever unused value.
· If we created the Snap7Partner as Active, we “uncheck” the flag “Establish an active connection” and vice-versa.
The Snap7Partner doesn’t need of a connection configuration, to work, it must be started with the “crossed” parameters.
The function is:
|
Par_StartTo(S7Object Partner, const char *LocalAddress, const char *RemoteAddress, word LocTsap,
|
Where
- LocalAddress is the IP Address of the PC in which our partner is running.
- RemoteAddress is the IP Address of the PLC.
- LocTsap is the local TSAP, we copy it from the PLC network configuration.
- RemTsap is the PLC TSAP, also this is copied from NetPro.
This example supposes that the Snap7Partner is the active one and has “192.168.0.10” as IP Address.
Remark
The remote TSAP parameter in a passive Snap7Partner has no effect, any connection request is accepted, and the only requirement is the IP Address.
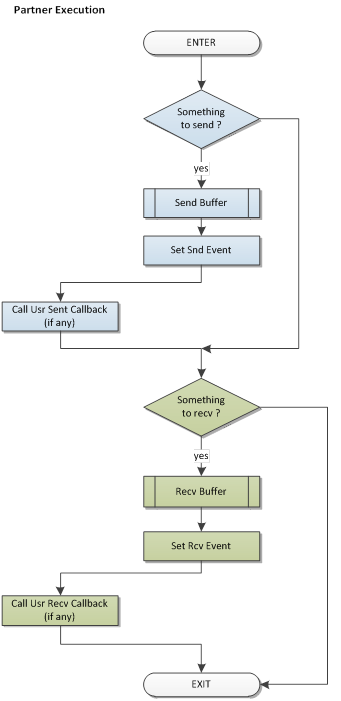
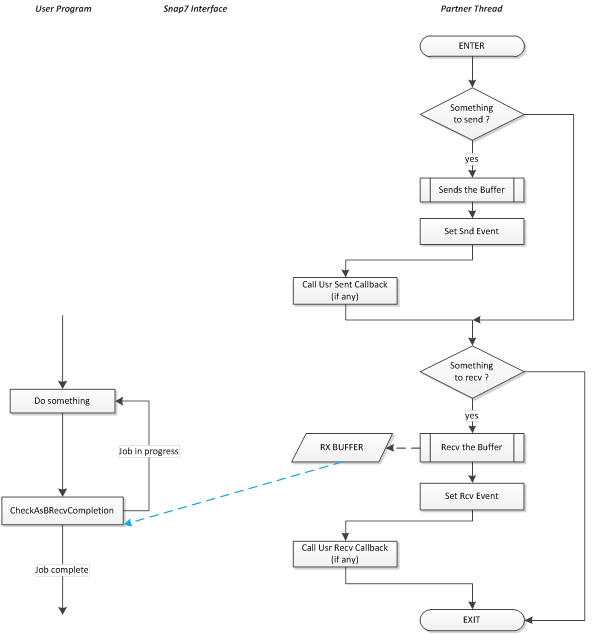
Partner thread
The sending and receiving data process are externally independent , however is necessary, inside the partner, to synchronize them.
To best way to understand how this happens, is to examine their flowchart.
On start, the Snap7Partner creates a worker thread:
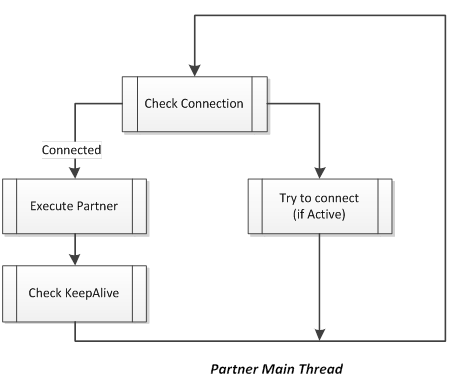
It’s an endless loop, if the connection checks are satisfied it executes the main work of the partner.
If a partner is connected (if active) or has an external connection (passive) has its status set as Linked.
The send and receive jobs are execute in the same thread but are mutually exclusive, this because a job involves many subsequent telegrams.
This is not a big penalty, since the communication channel of the PLC partner is arbitrated in the same half-duplex way.
At the end of the send task the Send Event is triggered and the user callback (if assigned) is invoked; the same happens at the end of the recv task.
To keep the synchronization, the send event is always cleared when a send job is started; the recv event is cleared by the BRecv function.
The Event/Callback mechanism, as we saw for the Snap7Client, allows a flexible way to handle the data flow.
Data Send
To send data to a remote partner we can use two functions : BSend and AsBSend.
The first is synchronous i.e. the
caller execution is blocked until the job is finished.
To be pedantic, this is not a “pure” synchronous function, since its body is
executed inside the worker thread, but the result is the same.
BSend
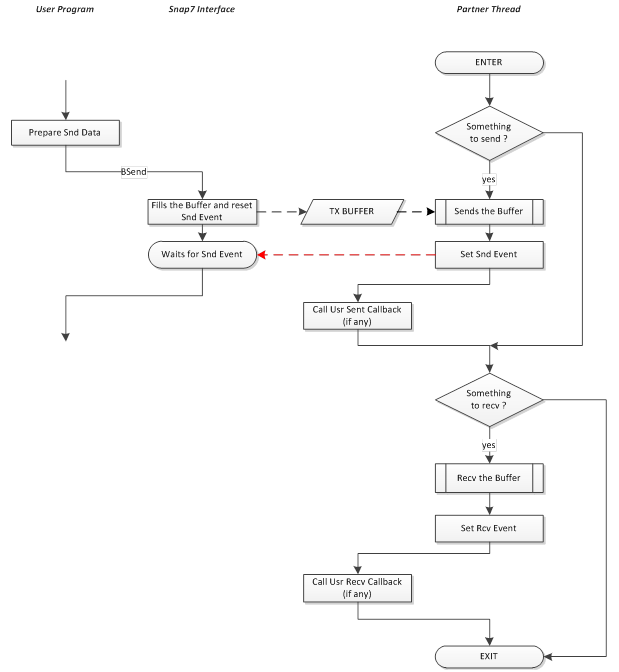
The function terminates when the data are correctly received by the remote partner or when the timeout expired.
AsBSend is asynchronous, the data are copied in the TX Buffer and the function terminates immediately.
To know when the job is complete we can use three methods :
1) The polling via CheckAsBSendCompletion function
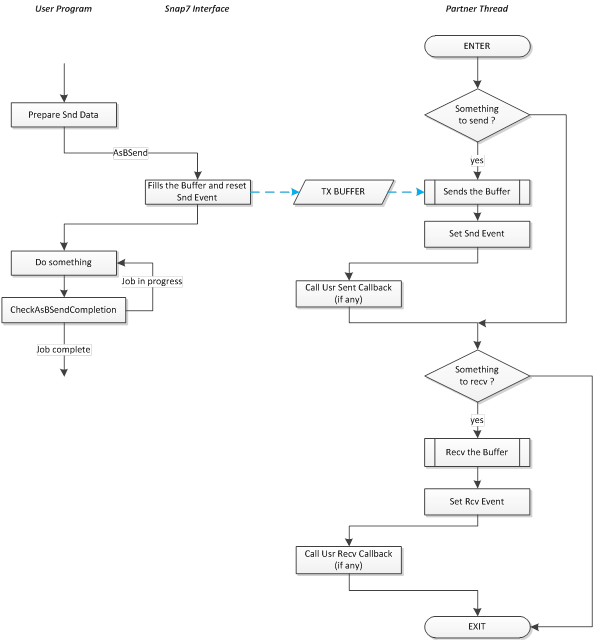
CheckAsBSendCompletion terminates immediately returning the job state : complete or in progress.
2) Use the function WaitAsBSendCompletion

This function terminates when the event is triggered or when the timeout expired.
Notice that BSend = AsBSend + WaitAsBSendCompletion.
3) Write a synchronization code into the callback.
Data Recv
We can receive a data packet in three ways :
1. Using BRecv synchronously.
2. Polling
3. Writing user code into a callback.
BRecv
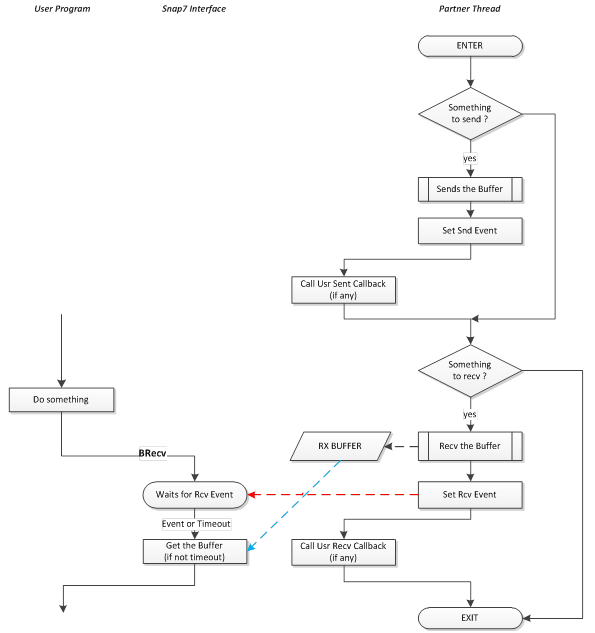
Obviously, we can use BRecv only if we know that the remote partner is sending something, otherwise a timeout error is returned.
Polling
For info about the callback method see Partner Applications.
Partner Applications
Surely you can insert your PC based automation in a PLCs context where they communicate with BSend/BRecv, but this is only a beneficial side effect.
The main purpose of Snap7Partner is the massive data collecting in industrial facilities using the robustness of the S7 Protocol.
Suppose to have a production line with the following characteristics:
· 75 stations PLC based.
· Takt Time : 5.0 sec./pcs.
· Each station must record its own process data into a server.
· These data cannot be queued, each station needs the data of the preceding one.
After excluding any polling
mechanism, we need a “store on demand” model.
To realize this is very simple with Snap7Partner.
Let’s suppose to create a TStation class that contains a Snap7Partner linked to
the station PLC.
ParDataIncoming is the gateway callback that each partner will invoke when an incoming data packet will be ready (1).
The station class initializes the partner callback passing it the ParDataIncoming address and its reference “this” (or Self in Pascal) as usrPtr; so usrPtr is the fingerprint of the station.
When a Partner receives a data packet, it invokes the callback supplying:
o usrPtr that received during the initialization.
o The operation result opResult that is not zero if an error was detected.
o The address of the buffer in which is stored the packet : pData.
o The packet Size in bytes (2).
o The parameter R_ID that was passed to FB12
The callback “casts” usrPtr to a station reference and calls its member StoreData passing it the remaining parameters.
StoreData now can check opResult and record the data where it wants…
An important note is that Snap7Partner completes the handshake with the PLC before calling the callback.
This means that the record process time can be extended up to the next packet incoming without worrying of the S7 timeout.
Notes
(1) If you program in C# there is no “plain” gateway callback, the partner will invoke directly a delegate method of the station class (see C# partner examples).
(2) This means that we don’t need to know in advance the packet size, it can vary across the transmissions.
C++
|
// Class definition class TStation() { private: TS7Partner *Partner; public: TStation(); void StoreData(longword R_ID, void *pData, int Size); };
// Class implementation TStation::TStation() { // Partner creation Partner = new TS7Partner(true); // or false // Callback set Partner->SetBRecvCallback(ParDataIncoming, this); // “this” parameter is the fingerprint of TStation instance. } void TStation::StoreData(longword R_ID, void *pData, int Size) { // Store the received data }
// Callback shared between all partners void S7API
ParDataIncoming(void *usrPtr, int
opResult, { // Cast usrPtr to TStation TStation *MyStation = (TStation *) usrPtr; // Call the member if (opResult==0) MyStation->StoreData(R_ID, pData, Size); } |